


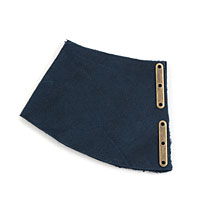
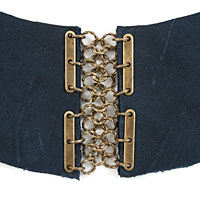
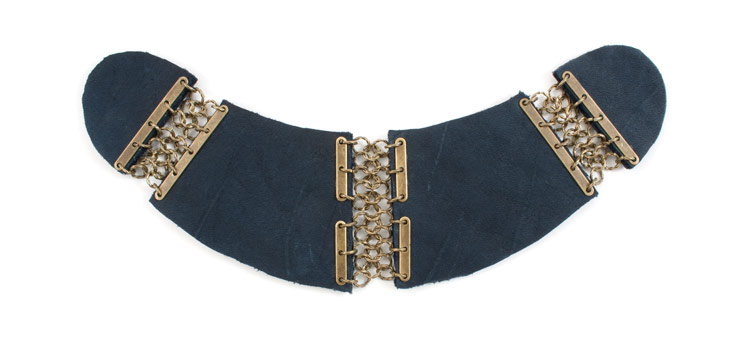
Project - Zayan
Plastron necklace made of leather section linked
by chainmail.
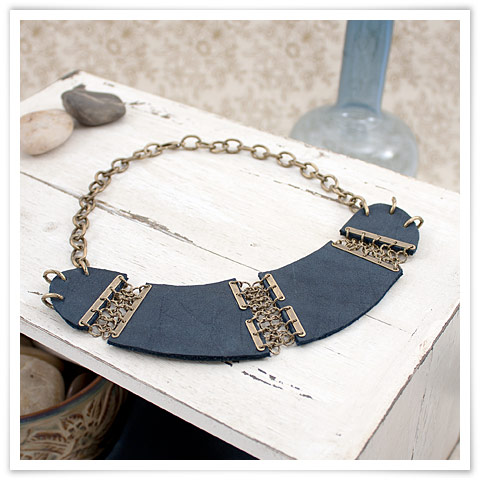
Material
- 2 pieces of 10 x 12.5 cm of leather sheet, navy blue
- 101 twisted jump rings of 6 mm, antique (vintage) brass
- +/- 32 cm of cable chain 9 x 12 mm, antique (vintage) brass
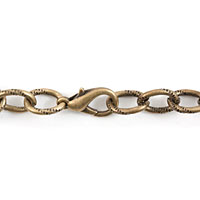
- 1, fish clasp of 18 mm, antique brass
- 8, spacers 5 metal holes, antique brass
- 8, spacers 3 metal holes, antique brass
Tools
- Scissors
- Glue E-6000
- Glue G-S Hypo (for fabric)
- Pen
- Cutting pattern
- Mandrel of 2 mm of diameter
- Tracing paper
- Scotch tape
- Beading awl
- 2 flat nose pliers
- Ruler
Making sections of leather
Step 1
Using scissors, cut two strips of leather that measure 10 x 12.5 cm. Cover the back of one of the strips with E-6000 glue then, glue both pieces onto each other so they overlap. To ensure adequate drying time, read the packaging’s instructions.
Step 2

Using tracing paper, trace and cut the patterns A & B, suggested for cutting sections of leather.
Click here to print the template
NOTE
Use the front side of the patterns to reproduce the first half of the plastron. Turn over the pattern to symmetrically reproduce the other half of the plastron.
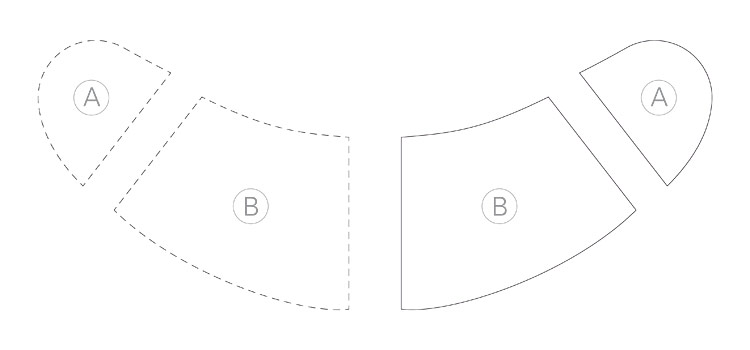
Step 3
Place the patterns on the leather, as illustrated and trace its outline with a pen.
Step 4
Using scissors cut the four pieces of leather.
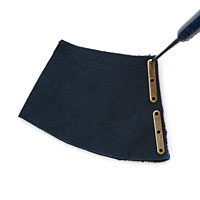
Preparing sections of leather to assemble
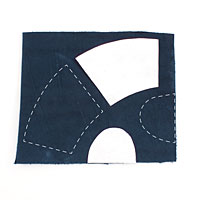
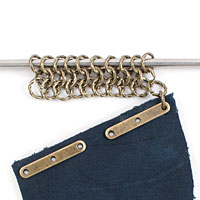
Step 5
Put a B section of leather on a working surface and on the larger side, place 2 three holes spacers as illustrated bellow. The spacers will serve as guides to punch the holes.
Step 6
Using a beading awl, press the leather against the working surface in order to punch matching the spacer’s holes. Tip: by exerting a good pressure on the beading awl, a dent will appear at the back of the leather strip, which can serve as a guide to position the other spacers.
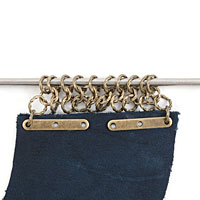
Step 7
After having punched all 6 holes on one side, turn the strip over. 6 little dents should be visible. Position 2 3-holed spacers so they match the dents and punch the 6 holes in the same manner as in step 6.
Step 8

Still using the beading awl, widen the holes in the leather strip. With one hand, hold the leather section and with the other push the beading awl while making rotating movement to facilitate its insertion. It is important to sufficiently widen the holes to later allow for the insertion of the chainmail’s rings.
TIP:To obtain holes that are more even, insert the beading awl on each side of the section of leather and repeat it for all the holes.
Step 9
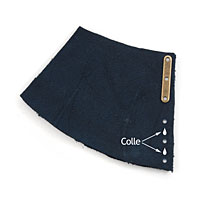
Put a little bit of G-S Hypo glue for fabric between each hole except for the middle interval. Glue the spacers in such a way as for their holes to overlap those of the leather. If needed, the beading awl can be used to facilitate the process. Do the same thing for the back of this section of leather. Follow the instructions on the glue’s packaging to allow for a proper drying time.
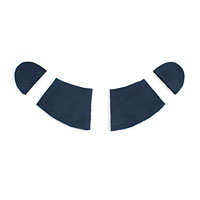
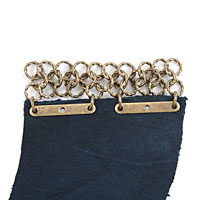
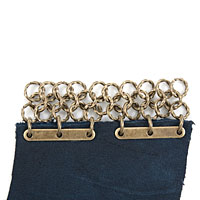
Step 10
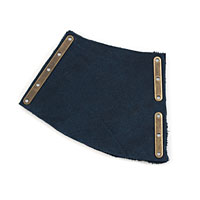
Place one 5-holed spacer as illustrated, then replicate steps 6 to 9 to make the holes and glue the spacer. This time, apply the glue between each hole. This section of leather will then be finished.
Step 11
Repeat steps 5 to 10 with the second section of B leather.
Step 12

Repeat step 10 to punch the holes and glue the 5-holed spacers on both A leather strips.
Making chainmail segments
Step 13
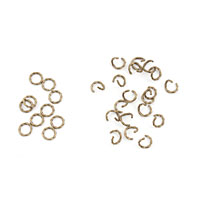
First, using 2 flat nose pliers, close 10 jump rings of 6 mm and open 19 of them.
Step 14
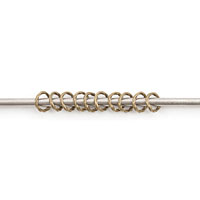
Insert 10 closed rings on a mandrel that has a diameter of 2 mm. Place them in such a way as for them to be oriented in the same direction, in this case towards the left.
TIP:Put some scotch tape on the mandrel to prevent the rings from sliding off while working with them.
Step 15
To start the second row, take an open ring and insert it in the first two rings on the right. Position it in direction opposite to the rings of the first row and close it.
Step 16
Take the second open ring and put it on top of the one you just added by inserting it into the second and third ring of the first row. Position it in the direction opposite to the rings of the first row and close it.
Step 17

Do the same thing to install the next ring by inserting it in the third and fourth ring of the first row. Continue like that until you have added 9 rings on the second row.
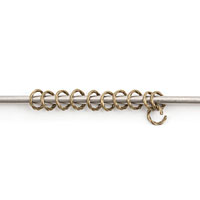
Step 18
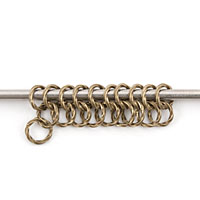
To start the third row, insert the first ring on the left of the second row, by orienting it in the opposite direction to the rings of the second row.
Step 19
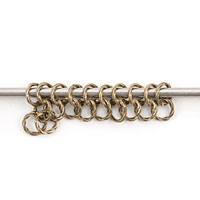
Then take a second open ring and place it on top of the one that you just added by inserting it into the first and second ring of the second row and close it.
Step 20
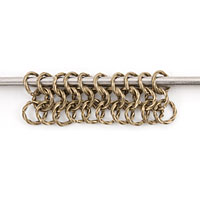
Continue as such until you have added 10 rings on the third row. The tenth ring should only be inserted in the last ring of the second row.
Step 21
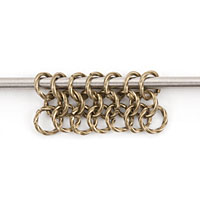
Repeat these steps to make the shorter two segments of chainmail. For these, the first and third row should have 7 rings and the second row should have 6 rings.
Assembling the middle sections of the necklace
TIP:To facilitate assembling the chainmail and the leather sections, it is suggested to leave the chainmail on the mandrel to prevent the rings from moving and changing sides.
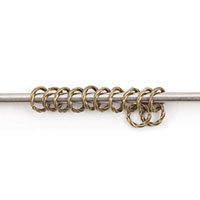
Step 22
Open 12 jump rings of 6 mm. Insert a first ring in the hole that is situated at the extremity of the strip of B leather and fix it to the ring with the extremity of the longest chainmail segment.
Repeat these steps for the other extremities of the leather strip and the chainmail. If needed, insert the beading awl once again in the holes of the leather piece to clear them and thus facilitate the insertion of the jump rings.
Step 23
Remove the mandrel then fix the middle section of the leather strip to the rings of the chainmail’s center as shown bellow.
Step 24
Insert jump rings in each of the leather strip’s remaining holes and fix them to the chainmail’s rings that are directly opposite to them, in other words in the third and eight ring of the row.
Step 25
Repeat steps 22 to 24 to link the other strip of B leather to the middle segment of the chainmail.
Step 26

Proceed in the same manner to join the two strips of A leather to the two remaining segments of chainmail, then to the strips of B leather. The rings that link the pieces of leather to the chainmail segments must be inserted in the 1st, 3rd, 4th, 5th and 7th ring of the rows situated to the extremities of the chainmail segments.
Final steps
Step 27
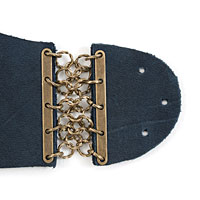
Use a beading awl to make 3 holes in the two strips of A leather, as illustrated.
Step 28
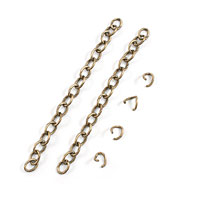
Measure and cut two sections of 14 cm of cable chain and open 4 additional chain links. If needed cut longer segments of chain, depending on the necklace’s desired length.
Step 29

Open the link that is at the extremity of a chain segment and fix it to the hole of the top part of a strip of A leather. Repeat this step for the other side of the necklace. Then fix the 4 other links in the remaining hole as illustrated.
Step 30
Open the links situated at the extremity of a chain segment and fix a fish clasp of 18 mm to it.
Inspiration & Variation